Tuesday, May 17, 2016

Wild card permissions in Jazn-Data.xml

When there are multiple secured resources  in an application it might be a little tough to handle all the permissions in Jazn-data.xml because of its growing size.

There is an easy way to fix this problem. You can make use of wild card feature of OPSS.

Eg: Lets say you have Taskflow1.xml, Taskflow2.xml, Taskflow3.xml, Taskflow4.xml and Taskflow5.xml  used in your application and all of them need to have authenticated role.

Instead of assigning permissions to each of them one by one, you can add a wildcard permission under desired role in source mode of jazn-data.xml -
<permission>        <class>oracle.adf.controller.security.TaskFlowPermission</class>
<name>/WEB-INF/.*</name>
<actions>view</actions>
</permission>

You can use similar approach to any valid resource available.

Hope it helps:-)

ADF Taskflow Transactions Management and Datacontrol scope - Part 3

In our previous post we had discussions about how DataControl Scopes and multiple Application Module Transactions interact with each other.

Lets use the same application used in previous post and discuss more about Taskflow Transactions Management

What is Transaction management in taskflow?
Transactions are managed by the Application Modules, As an application grows we might want to use multiple data controls from different application modules in a single view.

Eg : If we use datacontrol from 3 different application modules (Assuming they are not nested in Data Model) in one taskflow view, then we end up with 3 Root App Modules = 3 Database connections and the important part is we need 3 separate commits to post all changes to DB.

ADF taskflows offer an elegant solution to such problems,  that is to manage Transactions at taskflow level.

Lets see how it works -

Case 3 :
Parent Taskflow
Transaction - Always Begin New Transaction
Data Control Scope - ISOLATED

Child Taskflow
Transaction - Use Existing Transaction if possible
Data Control Scope - SHARED

As we saw in Case 1 and 2, each Application module is created as Root with separate Transactions.
In Case 3 lets make the Parent Taskflow to begin new Transaction and Child to Use the Existing Transaction.

This is how it works internally -


Key Observations -

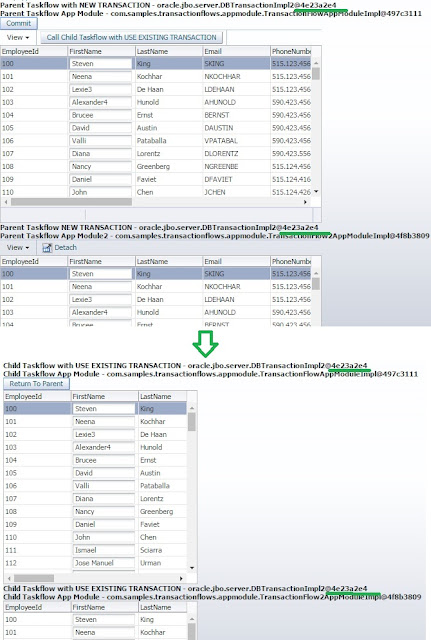
1) Parent Taskflow begins a new Transaction at Taskflow level and Child taskflow uses the same.

2) Only  Root Application Module(App module 1) is created and App module 2 is nested inside App Module 1. Hence overall only 1 Transaction and 1 DB Connection is used across different application modules and taskflows.

3) Only one DCFrame is used.

4) A commit/rollback in any iterator will commit the changes to DB since they use one Transaction.
There is also a better way to do it using taskflow return, which we can discuss later in different post.


Check out the flow in a real example, 
Notice that only one Transaction is used in all 4 iterators.


Similarly we can create multiple cases based on different Transaction management and Datacontrol scope options, But with the above examples you will be able to figure out those combinations pretty easily.

Eg : 
Case 4 :
Parent Taskflow
Transaction - No Controller Transaction
Data Control Scope - ISOLATED

Child Taskflow
Transaction - Always Begin New Transaction
Data Control Scope - ISOLATED

Parent taskflow will use 2 Transactions and Child will use 1.

Case 5 :
Parent Taskflow
Transaction - No Controller Transaction
Data Control Scope - ISOLATED

Child Taskflow
Transaction - Use Existing Transaction if possible
Data Control Scope - ISOLATED

Parent taskflow will use 2 Transactions and Child creates a new Transaction since no new transaction already exists in taskflow layer.

we can go on and on.. 


In my opinion, Don't use Transaction management options unless you absolutely sure of its use.. 
In most cases you needn't use it.

In simple terms - 
Data Control Scope - To manage DC Frames.
Transaction management options - To manage DB Transactions in taskflow layer instead of in the model layer using Application Modules.

You can checkout the application used in these blog posts from
https://github.com/bsatishinbox/FusionSamples/tree/master/TransactionFlows


Hope this helps.. :-) 


Monday, May 16, 2016

ADF Taskflow Transactions Management and Datacontrol scope - Part 2

In previous post we discussed in detail about basics Datacontrol scopes, Transactions and Application Module using single AppModule.

Now lets take it to next level and make it a little complex.

Below picture depicts how sample Parent and Child sample taskflows  used in this post are confgured.

As you can see we have 2 iterators from 2 different Application modules in parent as well as child  taskflow.

Case 1 (Default Taskflow Settings) -

Parent Taskflow
Transaction - No Controller Transaction
Data Control Scope - SHARED

Child Taskflow
Transaction - No Controller Transaction
Data Control Scope - SHARED

This is how it will work internally-


Key Observations -
Since Datacontrol Scope is set to Shared, Both the Taskflows will share same DC Frame.

Both AppModule1 and AppModule2 will create Root Application Module which eventually means 2 Connections, 2 Separate Commit/RollBack per transaction etc.

In Parent/Child Taskflows, Commit in Employee Iterator 1  will not reflect changes in Employee Iterator 2 and vice versa until new control state is created.

A Commit/RollBack in Child Taskflow's Employee Iterator1 will update changes in Employee Iterator1  of Parent Taskflow and vice versa because they share same Transaction.

A Real Example - Notice the Transaction and AppModule


Case 2  -
Parent Taskflow
Transaction - No Controller Transaction
Data Control Scope - SHARED

Child Taskflow
Transaction - No Controller Transaction
Data Control Scope - ISOLATED

This is how it will work internally-


Key Observations -
Since Datacontrol Scope of child is set to Isolated, Both the Taskflows will have separate DC Frames.

Since DC Frames are separate each of iterators will have Transactions of its own so 
2 Taskflows * 2 AppModules = 4 Transactions, 4 Connections(Not good right?)

Commit/RollBack  in any of the iterator will not affect any other.

A Real Example


Hope this helps:) In next post we can see how  Transaction options modifies the flow.


Sunday, May 15, 2016

ADF Taskflow Transactions Management and Datacontrol scope - Part 1

There are quite a few excellent articles over the internet about taskflow transactions and Datacontrol instances, but i felt it would be great to explain the full cycle with diagramatic examples and scenarios where these features would be of great use. So lets start..


How Transaction and Application Module are related?

Each Application module holds one transaction at a time, below diagram gives a you a better picture of how it works in relation to App Module.


What is a DataControl Frame?

A DC Frame is a container which holds state of all associated Data controls. It may be confusing now, but you will get more clarity once we see an example.

Eg : Lets take 2 different taskflows  "Employees"  and "Departments", Both these Taskflows use same Application Module(this is very important), default settings and are used on same page.

This is how it works internally.


A Commit/RollBack anywhere in the DCFrame would update all DC changes to DataBase
i.e. Commit/Rollback in Employees taskflow will Commit/Rollback changes in Departments taskflow too.

Check out the below example with sample data.
As you can see, Both the taskflows have same DC Frames.


What are Data Control Scopes?

Now that we have a good understanding of how Datacontrol Frames work, Lets discuss about Data Control Scopes.

There are 2 different kinds of DC Scopes -

1) Shared (Default, It is what we saw in previous example).
2) Isolated.

Now what if we want to separate out the transactions i.e. if a commit in Departments taskflow should not affect Employees Taskflow?

We have an option in Taskflow level to separate out the DataControl Frames,
Go to Taskflow behaviour > Set the Transaction  as "Isolated"


So lets see how it works internally


Here is the example with sample data -


Note the DC frame, it is different for both taskflows.
A similar example can be explained for parent and child taskflows too. A solid understanding of datacontrol scopes will help understand the next post in this series.

I hope this helps:-)


Wednesday, May 4, 2016

Tuned development environment setup - JDeveloper and Integrated Weblogic server

There has always been complaints by developers regarding low memory warning or slowness in JDeveloper and Integrated Weblogic Server, especially while in debug mode or using ODL Log Analyzer :-(

So am just going to jot down few details which might help to alleviate these issues.

JDeveloper Installation -

Default Jdeveloper windows/linux  runnable verion ships with  32 bit JDK (Java 1.6).

Most of the latest development laptops have more than 4 gig memory, In that case 32 bit JDK will not be able to utilize memory addresses higher than 2^32..

So if you have a 64bit OS and more than 4GB of RAM

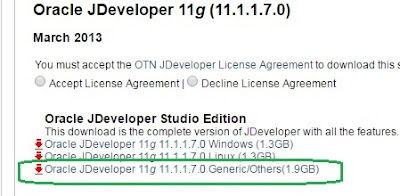
You can download JDeveloper in jar format and install it with 64 bit JVM (Java).


Make sure you download the version of JAVA that is matching your weblogic in HIGHER Environments.

Eg: In my previous project, higher environments were running on JDK 1.60_45 so i used same version of 64 bit JDK for my local environment.

JDeveloper Memory Tuning -

1) Go to MW_HOME \jdeveloper\ide\bin\ide.conf and increase the Max heap size (Xmx).
    In my opinion you can set it to (Total RAM/2).

    AddVMOption  -Xmx4096M

Note: I have 64bit OS with 8GB RAM.

2) Go to MW_HOME \jdeveloper\jdev\bin\jdev.conf and set the following parameters

// Point it to 64 bit JDK you have installed in step 1
    SetJavaHome C:\Program Files\Java\jdk1.6.0_45

// Increase your MaxPermSize
AddVMOption  -XX:MaxPermSize=1024M

//Adds a memory monitor which helps in check current heap used by //JDEV, we can also do a force GC with this feature

AddVMOption -DMainWindow.MemoryMonitorOn=true


//ADD the following JVM options towards the end of file 
AddVMOption -XX:+UseStringCache
AddVMOption -XX:+OptimizeStringConcat
AddVMOption -XX:+UseCompressedStrings
AddVMOption -XX:+UseCompressedOops
AddVMOption -XX:+AggressiveOpts
AddVMOption -XX:+UseConcMarkSweepGC
AddVMOption -DVFS_ENABLE=true
AddVMOption -Dsun.java2d.ddoffscreen=false
AddVMOption -XX:+UseParNewGC
AddVMOption -XX:+CMSIncrementalMode
AddVMOption -XX:+CMSIncrementalPacing
AddVMOption -XX:CMSIncrementalDutyCycleMin=0
AddVMOption -XX:CMSIncrementalDutyCycle=10

 Integrated Weblogic Tuning -

You can increase the heap parameters of integrated weblogic server
to address slowness while debugging applications.

Go to C:\Users\<UserName>\AppData\Roaming\JDeveloper\system11.1.2.4.39.64.36.1\DefaultDomain\bin\setDomainEnv.cmd

If you are using 64 bit JVM then make sure you have below settings. Skip this step if you want to continue with 32 bit jvm.


 Since I use a 64bit Sun JVM, I changed the value of XMX_SUN_64BIT.

Based on your JVM configuration modify the appropriate attribute.


Increase your PERM Size -


Alternatively you can use 
set USER_MEM_ARGS=-Xms256m -Xmx1024m -XX:CompileThreshold=8000 -XX:PermSize=128m -XX:MaxPermSize=512m
below this line in cmd file 
@REM IF USER_MEM_ARGS the environment variable is set, use it to override ALL MEM_ARGS values.

Finally you can start your weblogic server and verify if changes are reflected -


Note: Don't increase your integrated server heap to higher values than necessary because higher the heap size -> higher GC pause time:-) In my opinion 1GB should be good enough.

Hope it helps :-)